Detailing
The model runs very nice - now it's time to begin decorating it. From the prototype photo I'm basing this on.....
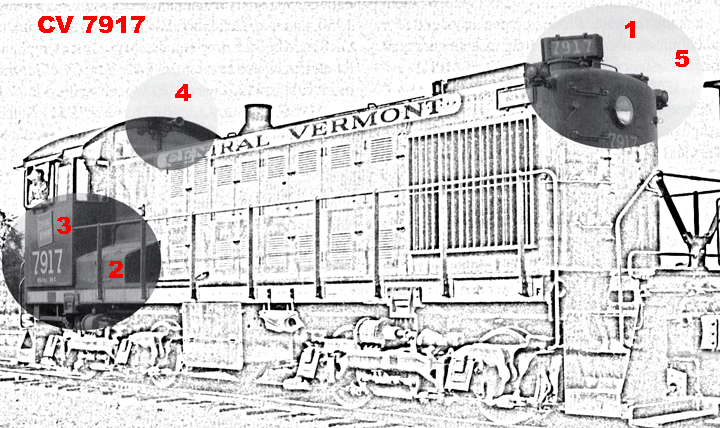
I'm going to try and tackle the parts in numbered order.
- Triangle shaped illuminated number boards on hood.
- Sloped storage locker
- Raised emblem
- Accurate Horn
- Steam Marker Lights
First up - the lighted number boards! I started by comparing the N3 TRIANGLE NUMBER BOARDS CNR Triangle Steam Engine Number Boards from Miniatures by Eric (lower left) with the Details West Auxiliary Number Boards for Switchers.

Turns out the auxiliary boards are meant to go back on the hood towards the cab; their size was too big for this application. The CNR triangle fits the model a lot better, and matches the prototype more closely.

I had to add a plasticard back.

I added a styrene riser, and as I wanted it lighted, I drilled slowly through both the number board and the plasticard. Despite being careful, I managed to crush the number board.

Fortunately for me, I had ordered a couple extra, and after some good advice from an online source, wedged a thick piece of styrene inside the number board, and successfully drilled a new hole.

and with that finished, I put another styrene back on it.

Next up was the sloped storage locker. This will be a fabricated item from styrene. Here I'm sizing up the rough dimensions of the locker using the prototype picture and a piece of thick styrene

Once I had an approximate size down, I cut a bottom and front from the same thick card.

and sized that up for a fit.

I sanded the front and back top edges along a piece of sandpaper to get a nice angled slope, than glued that to a sheet of thin (.10) styrene Note that in this picture, it's glued to the whole sheet, I often find it easier to cut away than to try and cut a piece to fit.

and another size check. It first sat too high, I ended up sanding the bottom pretty heavily to reduce the over all height of the storage locker.

With the height good, I added the side facing the front of the locomotive using the same thin styrene

And than a lid to the storage locker (same styrene).

Quick road test, with the light board just sitting (not attached).

I think the size is looking right!

Next up, the raised emblem. I'm using the Microscale Central Vermont, Grand Trunk, Grand Trunk Western, Duluth, Winnipeg & Pacific -- Steam Locos 1931-60 decal sheet, which has a small(er) Central Vermont herald; this is still a little too big, but is going to have to work.
Using that same .010 styrene, I cut two squares to fit the size of the decal I wanted to use, and drew a pencil mark for centering the herald under the windows.

Tinkering around with it, I tried measuring angles (I've read somewhere that the herald is tilted 30 degrees, but don't quote me!) until I got it to look about right to my eye.

And glued in place on the side of the cab. The styrene looks so much thicker in these pictures than in person, but I may still sand it down and thin.
Note a this stage the number board on top is also glued in place, and after looking at the horns I purchased versus the stock Atlas one, the stock one looks spot on (so it's in place.


Yes, that's the capacitor in the window. We need to find a new home for that.


It was recommended to move the capacitor on top of the speaker, and you can see the result here with the clear cab view.

It shows a little, not too bad!


With that sorted, and with new drill bits, I was able to install the front marker lights

and make hinges for the toolbox from .015" solder.

Finally al of the pieces are now in place. I'll sand the top of the number boards smooth, than re-prime.
