Planet Name:
Lyger
Planet Description: Green Agri-planet, limited industrial capabilities.
Notes: See the mission tree below for Mission paths. Naturally you may adjust maps to match scenery available, and point spread to match models and armies involved. See the WarHammer 40K rule book and the Space Marine Codex for detailed mission objectives and descriptions.
Contents:
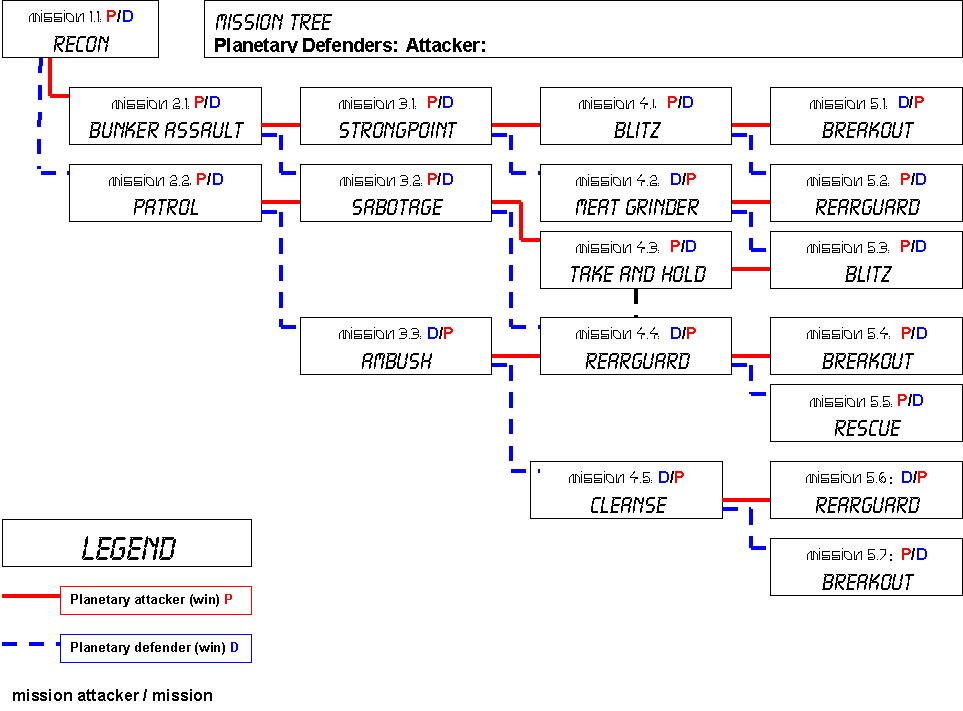
| Mission Tree | |
| Mission Descriptions | |
| Mission Path Campaign Results | |
| Suggested Mission Maps | |
| Contact | |
| Return to Scarpia's WH40K |
The
following table refers to the planetary attacker as PA, and planetary defense
as PD
|
Mission |
Map |
Force
Size |
Description |
|
0.0
Planetfall |
Planetfall |
1000 |
Use
this mission only if attacking with Space Marines. If not, than proceed
to mission 1.1. |
|
1.1:
Recon |
Valley |
750 |
Upon
planet fall, PA reconnoiters the area in search of PD base. |
|
2.1:
Bunker Assault |
Bunker |
2000 |
After
identifying the location of PD troops. PA units attempt to smash a hole
in PD defenses |
|
2.2:
Patrol |
Valley |
1000 |
Having
been made aware of PA presence in 1.1, PD steps up patrols in the area. |
|
3.1:
Strongpoint |
Line |
2000 |
Building
upon earlier successes, PA units exploit the gap created in 2.1 and try
to eliminate a major PD defensive structure. |
|
3.2:
Sabotage |
Rear |
1000 |
Having
avoided stepped up PD patrols in 2.2, PA units try and create a gap in
PD defenses by destroying an important resource. |
|
3.3:
Ambush |
Valley |
2000 |
Their
patrols successful, PD commanders have identified the location of the
main PA force, and prepare a carefully designed welcome to the invaders |
|
4.1:
Blitz |
Line |
2000 |
The
tide of invasion moves on, sweeping all before it. PA units attempt to
crush the remainder of the planets defenses. |
|
4.2:
Meat Grinder |
Line |
2000 |
Having
failed in defeating PD forces outright, PA commanders order a massive
charge in order to eliminate further resistance once and for all. |
|
4.3:
Take and Hold |
River |
1500 |
Their
sabotage in 3.2 successful, PA troops attempt to secure a vital river
crossing while the PD units are in confusion. |
|
4.4:
Rearguard |
River |
1500 |
Thrown
into chaos by the successful ambush in 3.3, PA units attempt to extradite
themselves from combat and regroup. |
|
4.5:
Cleanse |
Valley |
2000 |
Their
ambush in 3.3 only partially successful, PD troops move in to secure the
area, while PA units regroup and turn to face the enemy. |
|
5.1:
Breakout |
Rear |
2000 |
PD
units attempt desperately to remove themselves from combat before they
are annihilated. |
|
5.2:
Rearguard |
Rear |
2000 |
PD
units fall back in a controlled rearward motion, and withdraw from the
planet |
|
5.3:
Blitz |
Line |
2000 |
PA
troops attempt one last desperate push into the PD defenses. |
|
5.4:
Breakout |
Valley |
1500 |
PA
troops attempt to withdraw from the planet before they are destroyed |
|
5.5:
Rescue |
River |
1000 |
PA
troops attempt desperately to rescue a missing commander before their
forced evacuation |
|
5.6:
Rearguard |
Valley |
1500 |
PA
units attempt to extradite themselves from combat and regroup before withdrawing
from the planet. |
|
5.7:
Breakout |
Valley |
1500 |
PA
units try desperately to save themselves from total destruction |
Each mission carries with it a 500-point victory award to the winning side, above and beyond all other point awards.
The following table is for completion of the campaign. The winning side receives 1000 points for the campaign victory, amount to be added to mission totals. In the case of withdraws or retreats, point cost of surviving units is to be deducted from victor’s 1000 point award (i.e.: if 500 points of attackers safely withdraw, winner only earns 500 points).
|
Mission Ending: |
Campaign
Result |
|
Mission
5.1: Breakout |
Planetary
Attacker victory – defenders destroyed |
|
Mission
5.2: Rearguard |
Planetary
Attacker victory – defenders retreat |
|
Mission
5.3: Blitz |
Victory
Point Dependant – add total points for campaign. Loser retreats from planet |
|
Mission
5.4: Breakout |
Planetary
Defender Victory – attackers withdraw |
|
Mission
5.5: |
Planetary
Defender Victory – attackers destroyed |
|
Mission
5.6: Rearguard |
Planetary
Defender Victory – attackers withdraw |
|
Mission
5.7: Breakout |
Planetary
Defender Victory – attackers destroyed |
The following are suggested maps to be used with this campaign.
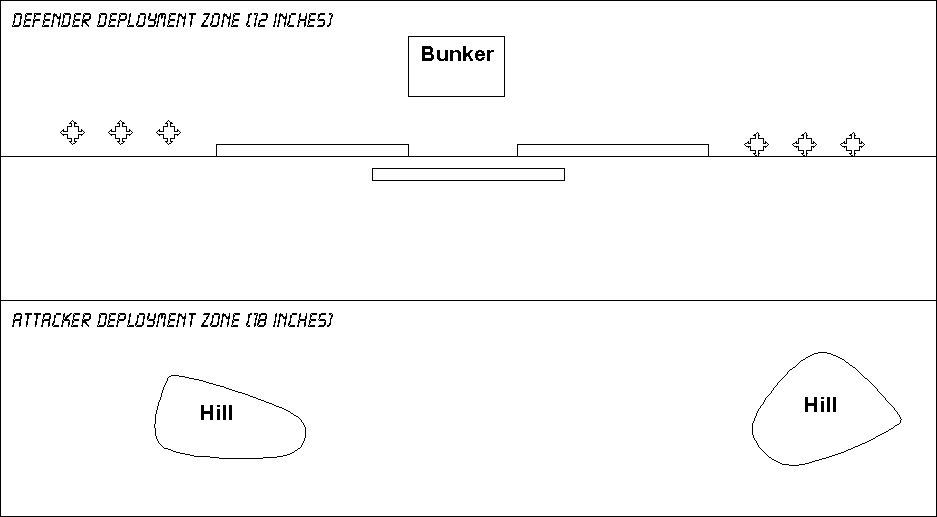
Map
Name: Bunker
Map Notes: Barriers and trenches are to be placed in front of the Bunker
itself.
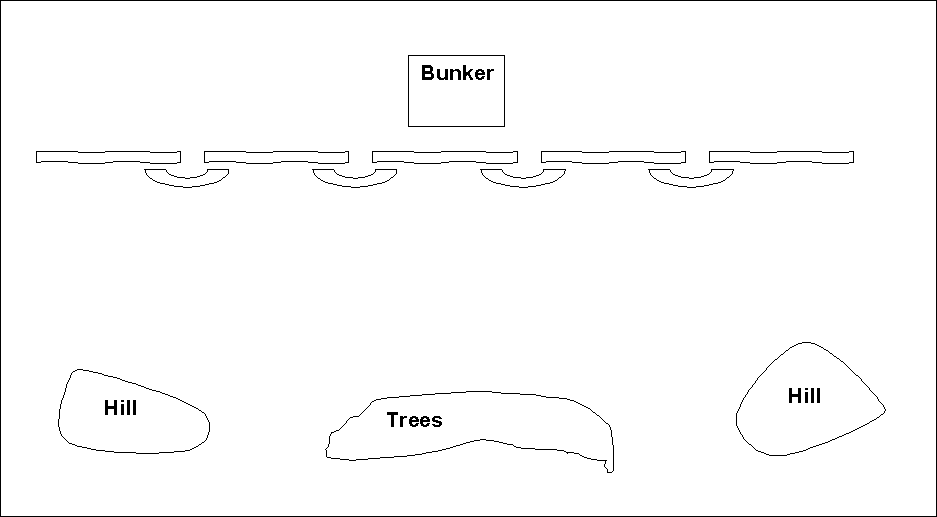
Map
Name: Line
Map Notes: Barriers and trenches are to be placed in front of the Bunker
itself. Trees are difficult terrain, and models are unable to see or shoot thru
them.
Map
Name: Planetfall
Map Notes: Trees are difficult terrain, and models are unable to see
or shoot thru them. Ruined tower should be replaced with command structure or
building if possible
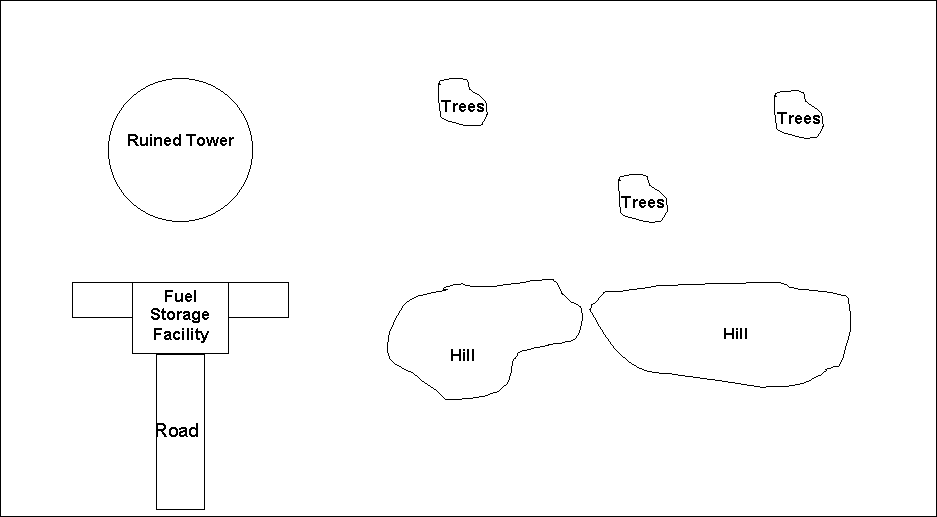
Map
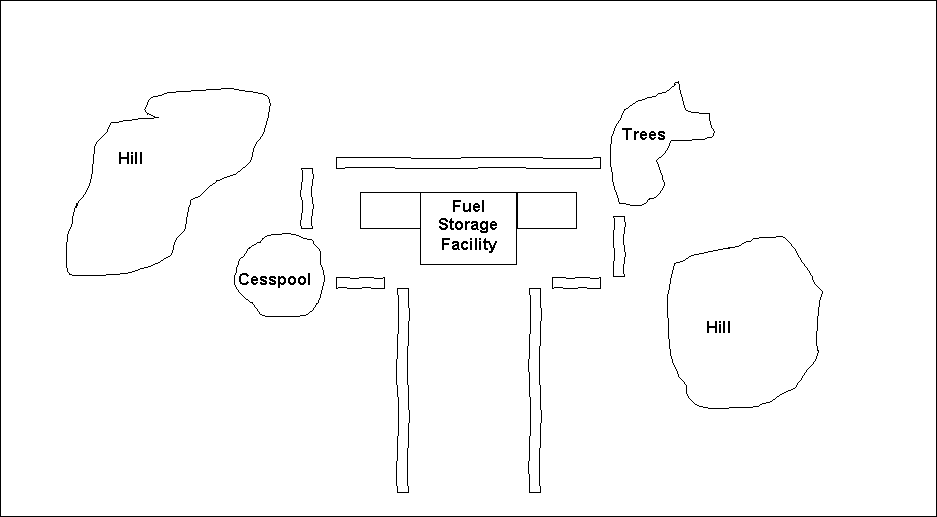
Name: Rear
Map Notes: Walls or fencing is to be placed around the Fuel Storage Facility.
Trees are difficult terrain, and models are unable to see or shoot thru them.
Cesspool is impassable by ground based units.
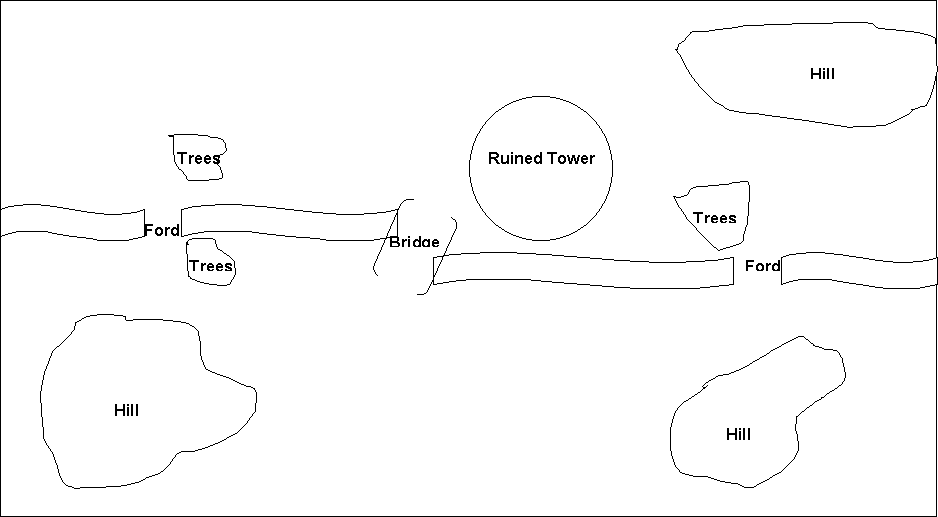
Map
Name: River
Map Notes: Trees are difficult terrain, and models are unable to see
or shoot thru them. Fords are also difficult terrain, and the river itself is
impassable terrain. The bridge should be large enough to allow vehicles
up to a land raider to cross.
Map
Name: Valley
Map Notes: Trees are difficult terrain, and models are unable to see
or shoot thru them.
