
As seen in White Dwarf North American Edition, #309, October 2005!
As a submission to a competition on the WAAAGH, here's a heavy bunker da boyz call da Gobtress. I'm happy to provide complete instructions as well as work in progress photos below.
Completed 7/08/05
Modeling
First step was cutting a 12 x 8 inch piece of 1/4" MDF board for a base. The edges were rounded and smoothed, and than a rough design was penciled in on the base. The over all goal was to make the bunker look a bit like a gob from above.
Next, cut a strip of 1 inch foam core, divided into right triangles, These will be the base wall supports. Put the six angles in place along the inside of the penciled line. Next up are the sides themselves; due to the length of the angle, these strips of foam core are 1.5 inches tall.
The main kannon port should be staggered, so cut two pieces of identical 1 inch high foam core. Cut out the bigger window in the top piece first, and using that as a template, cut out a smaller window for the bottom piece, just as the bunker in the main rule book is constructed. Glue those two pieces together, and than glue in place on the base, with the center window roughly centered.
The front outside angles are also odd pieces, and are also 1.5 inches high. You'll need to cut and adjust these to fit. At this stage, don’t worry about the rough joints, as we'll cover them later. The inside front angles are extremely odd, as you transition not only from an angled to a vertical wall, but also the difference in height. Start with a 1.5 inch tall piece, and again cut to fit.
With the front finished, lets move on to the back. Use 1 inch tall strips of foam core. The gap in the back should be fit a chimera rear gate. While the inside won’t be modeled, it’s still important to run some additional 1 inch tall foam core strips for structural support.
The kannon should be made next. I opted for twin linked - co-axial (whatever) kannons for the model. These are made from plastic tubing, and are not heavily detailed, as the majority will be deep inside the bunker. Use plain plasticard for a blast shield, and put a pin in the back so that the kannon can actually swivel!
With the outside walls and kannon in place, you can cut the top, cut the general shape, and than trim it tight when after it’s glued and permanently attached. Don’t forget to cut a slight gap for the chimera door.
To carry through the gob image, draw out the lines where the "teef" will go on the top. Note the top walls are of varying height, 1.5 inches on the outside, 1 inch in the middle, and .5 inch in the center. The back of the bunker was built up with more foam core to wall it in.
Plain old 3x5 paper card was used as a “sub" floor. This floor will be buried shortly, but it's important to have something down before the floor itself is down. paper card is cheap and effective. Ladders are created using heavy duty staples pushed in to the foam core. It helps to start a hole with a pin vice before pushing the staples into the board.
For the floor surfaces, I prefer needlepoint/cross stitch card. It’s very thick but flexible, and it's see through nature makes it easy to trace exact contours and cut out with a pair of scissors. Any missing spots or bad joints can be covered with plasticard to represent repairs.
With the flooring down, next was to beef up the concrete areas with bolted on metal plates. A quick dive into the old bitz box lent to salvaging a fair amount of IG, Marine, and Ork bitz that were glued to the top edge of the outside wall as further protection for the occupants.
To apply the concrete surfacing to the model, first tape over the gaps with masking tape. Next, create a concrete mixture of 1 part gesso, 1 part pva glue, one part modeling sand, and two parts water. Stir this mixture well and keep stirring while using. Brush and dab this mixture onto the concrete areas of the model; past experience has shown that more thin coats looks better in the end than one thick coat, so feel free to modify the formula above to suit your needs. Allow each coat to dry before applying the next one.
Once the concrete was dry, add a roof as you like. This one is made from the dozer blades from the old imperial vehicle accessory sprue and plastic I-Beams. I also added metal supports (cut from the battlefield barricades sprue) to the back, and a barrel.
I based the rest of the model using sawdust instead of sand, one advantage here is the textures of the materials will be sufficiently dissimilar than the concrete walls. To base with sawdust, simply brush on a water/glue mixture, and sprinkle on sawdust. When dry, shake off the excess, and repeat. A final coat of just the water/glue mixture is important to really fix the sawdust to the base, and allows for even paint absorbtion.
The upper, removable grot tower was assembled in perfect orky fashion, out of scrap materials, including the land raider top! I began cladding the outside of the tower with metal plates off of another project, but really, these are just plasticard and plastic rivets. They sides hang over the walls of the bunker, and will secure the piece to the bunker. The top big shoota turret is modified from the skorcha turret. The skorcha was cut off, and replaced with a Dreadnought big shoota.
Painting
In order to match my home ash waste table, the terrain will be done in grayish hues. The entire model was primed with Citadel black spray primer. First up for the concrete areas was a base coat of dark flesh, followed by a heavy drybrush of shadow gray. When that’s dry, everything but the metal gets hit with a codex gray drybrush coat. Note that if you over do it here, and hit metal parts, that's ok!
Next up is a vermin brown coat over the metal as a rust base. Then thin washes of color were put down over some of the metal parts - scab red, bestial brown (for yellow), ultramarine blue, and catachan green, to represent the looted parts. When those had dried, another light drybrush of tin bitz, even over the decking, was applied. Afterwards, fortress gray was than brushed over everything: heavy on the concrete, medium on the terrain, and light on the metal work. As a last step, skull white was "edged" on the concrete, and lightly drybrushed. Finally, a little boltgun metal was also drybrushed over the metal sections.
 |
First step
was cutting a 12 x 8 inch piece of 1/4" mdf board for a base. The
edges were rounded and smoothed. |
 |
A rough design
was penciled in on the base. I wanted it to look a bit like a gob from
above. |
 |
Next, I cut
a strip of 1 inch foam core, which was divided into right triangles, These
will be the base wall supports. |
 |
The six angles
were put in place. |
 |
And on came
the sides. Due to the length of the angle, these strips of foam core are
1.5" |
 |
The main kannon
port I wanted staggered, so two pieces of identical 1 inch high foam core
was cut, and the bigger window in the top piece cut first. Using that
as a template, I was able to cut out a smaller window for the bottom piece. |
 |
Those two
pieces were glued together, and than in place on the base. |
 |
The center
window should be roughly centered. |
 |
The front
outside angles are odd pieces, also 1.5 inches high. You'll need to cut
and adjust these to fit. |
 |
The rough
joints are ok, as we'll cover them later anyway. |
 |
Now the inside
front angles are extremely odd, as you transition not only from an angled
to a vertical wall, but also the difference in height. Start with a 1.5"
tall piece, and again cut to fit. |
 |
With the front
angles in place. Again, the gaps will be concealed later on. |
 |
With the front
finished, it's ok to work on the back. Use 1 inch tall strips of foam
core. The gap in the back happens to fit a chimera rear gate. The two
angled sections inside are not for detailing (as the interior will be
closed) but instead for structural support. |
 |
The top of
this section is than cut. I rough cut the general shape, and I'll finish
it when it's permanently attached. |
 |
In the rear,
a slight gap had to be cut for the chimera door. |
|
The kannon.
I opted for twin linked - co-axial (whatever) kannons for the model. These
are made from plastic tubing, and are not heavily detailed, as the majority
will be deep inside the bunker. |
 |
Upside down.
Note the pin, this allows for the kannon to actually swivel! |
 |
The kannon
in place. The pin fits in another piece of plastic tubing that is glued
to the base. |
 |
A rear shot
of the gun mount. |
 |
With the gun
in place, a single piece of foam core goes over everything, pinning the
gun in place. |
 |
Rear shot. |
 |
To carry through
the gob image, draw out the lines where the "teef" will go. |
 |
And based
on those lines, the front walls go in. Note the walls are of varying height,
1.5 inches on the outside, 1 inch in the middle, and .5 inch in the center. |
 |
A close up
of the staggered levels. |
 |
The back of
the bunker was built up with more card, and don't forget to cut out the
top of the chimera gate for the center piece. |
 |
The rear section
is in place, as well as additional floor supports. |
 |
A top down
view, showing the structural supports. |
 |
And with plain
old 3x5 paper card "sub" floor. This floor will be buried shortly,
but it's important to have something down before the floor itself is down.
paper card is cheap and effective. This picture really shows the "gob"
effect. |
 |
Front view |
 |
|
 |
Ladders are
created using heavy duty staples pushed in to the foam core. This is where
things start to get orkified! |
 |
For the floor
surfaces, I prefer this needlepoint/cross stitch card. Very thick but
flexible, it's see through nature makes it easy to trace exact contours
and cut out with plain old scissors. |
 |
I don't worry
about what color cross stitch to use, as it will be painted anyway. The
missing spots will have hard plates over them (repairs). |
 |
|
 |
With the flooring
down, next was to beef up the concrete areas with bolted on metal plates.
|
 |
A quick dive
into the bitz box lent a fair amount of IG, Marine, and Ork bitz! |
 |
Now you might
also be noticing the masking tape. This goes down before the concrete
treatment (which is coming soon) in order to hide the major gaps. |
 |
|
 |
Next up was
fitting this removable tower piece, based on a land raider front end.
This will support a quad BS turret, and the whole thing will be removable
for use elsewhere. |
 |
A separate
view of the tower |
 |
I began cladding
the outside of the tower with metal plates off off another project, but
really, these are just plasticard and plastic rivets. They over hang the
lower edge, and will secure the piece to the bunker. |
 |
|
 |
|
 |
|
 |
|
 |
|
 |
|
 |
|
 |
Some more
gubbinz, plates (recent ones over the concrete), and roofworks. |
 |
A close up
of the "roof". these are the dozer blades from the old imperial
vehicle accessory sprue and plastic I-Beams. |
 |
I added metal
supports (from the barricades sprue) to the back, and a barrel. |
 |
The upper
tower is assembled, in perfect orky fashion, out of scrap materials, including
the land raider top! |
 |
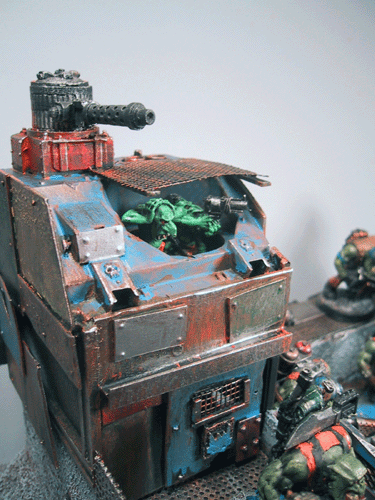
The top BS turret is modified from the skorcha turret. The skorcha was cut off, and replaced with a Dreadnought BS. Check out the sliding doors! |
 |
The tower
is removable from bunker. There is one more turret coming, as soon as
my bitz arrive... |
 |
Back view,
with tower in place, and the flock material in place. For instructions
on how to flock with sawdust, as seen here, please check out the sawdust
page. |
 |
|
 |
|
 |
|
 |
With a boy
for scale. |
 |
The base model
with a coat of black primer. |
 |
|
 |
And the base
coat of dark flesh over the concrete areas. |
 |
|
 |
A heavy drybrush
of shadow gray goes next over the concrete portions. |
 |
|
 |
and than everything
but the metal gets hit with codex gray. Note that if you over do it here,
and hit metal parts, that's ok! |
 |
|
 |
next up was
vermin brown over the metal as a base, rust coat. |
 |
|
 |
and then thin
washes of color were put down over some of the metal parts - scab red,
bestial brown (for yellow), ultramarine blue, and catachan green, to represtent
the looted parts. |
 |
|
 |
when those
had dried, another light drybrush of tin bitz, even over the decking. |
 |
|
 |
fortress gray
was than brushed over everything. Heavy on the concrete, medium on the
terrain, and light on the metal work. |
 |
|
 |
as a last
step, skull white was "edged" on the concrete, and lightly drybrushed.
A little boltgun was also drybrushed over the metal sections. |
 |
|
 |
and a final
picture, with the kannonz painted, and some graphics in place. |
 |
|
 |
Don't forget,
this is supposed to be a gob.... |
 |
With that
done, we can switch gears, and paint the grot tower. First primed... |
 |
|
 |
than a heavy
drybrush of vermin brown |
 |
|
 |
and than panels
wer painted in a watered down colors |
 |
|
 |
some ultramarine
blue.... |
 |
|
 |
after that,
another drybrush of tin bitz |
 |
|
 |
and than finally
a heavy boltgun metal drybrush for that worn look. |
 |
|
 |
Ah, with the
grot tower in place! |
|
and fully
manned by da boyz! |
 |
|
 |
make the noise
stop!!! |
 |
|
 |
|
 |
Get dat ammo
in dere, ya zoggers! |
 |
|
 |
return to Scarpia's Warhammer 40K
'ere is dem nasty legal bits:
This website is completely
unofficial and is in no way endorsed by Games
Workshop Limited.
Dark Angels, Eldar, Games Workshop, Warhammer, Adepta Sororitas, Adeptus Astartes,
Cadian, Catachan, Citadel, the Citadel logo, Codex, Dark Eldar, 'Eavy Metal,
Falcon, Fire Prism, the Games Workshop logo, Games Workshop, Genestealer, Slottabase,
Immolator, Leman Russ, Mordian, Necron, Ork, Predator, Raider, Ravager, Space
Marine, Tyranid, Ultramarines, and a bunch of other words, are trademarks of
Games Workshop Limited. Used without permission. No challenge to their status
is intended.
©2004. This site is the sole work of Scarpia (Thomas Garbelotti) unless otherwise noted. All content not created by Scarpia is copyrighted by the respective copyright holders.
